How To Increase RAM On Your Android Smartphone

Are you facing low ram on your android device, if yes this article is for you am going to show you 4 methods to increase you android ram, after following these methods your phone won’t freeze again and you will be apple to multitask smoothly and also run heavy games on your android phone? follow these below methods on how to increase android ram. but first, i want you to know that some of these apps require root permission, so if your device is not yet rooted then do it to be able to use most of these methods

Using Roehsoft RAM Expander(Swap)

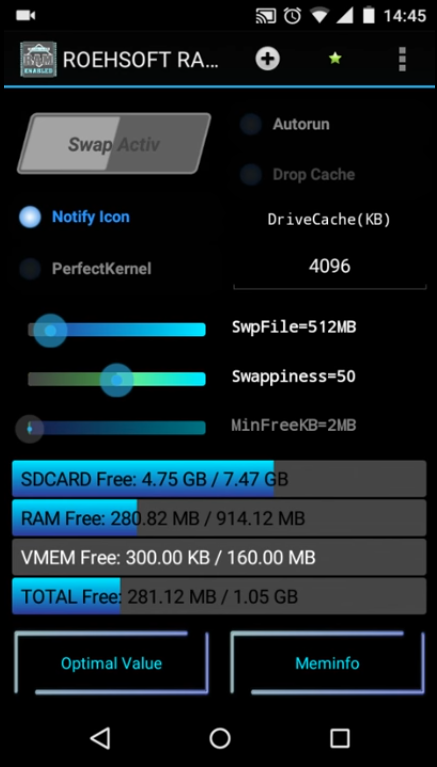
Roehsoft is an android app that allows you to increase your android ram this app is not free in playstore but you can get it for free from here,roehsoft app is the best and most known app to increase android ram, with this app you either chooses to use your internal or external storage to increase your ram, to do this you will need fast sd card

Step 1 First of all, download and install Roehsoft Ram Expander(Swap) on your rooted Android device.

Step 2. Now after installing open the app and grant it a superuser request.

r

Step 3. Now you will get to see SDcard memory, Free Ram, Total Free RAM.

Roehsoft RAM Expander

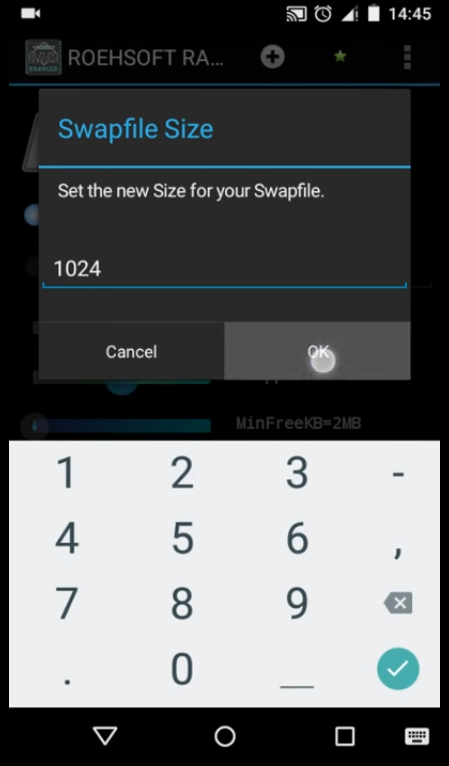
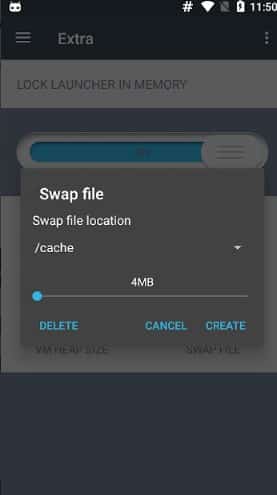
Step 4. You need to set the new size for your Swapfile.

Roehsoft RAM Expander

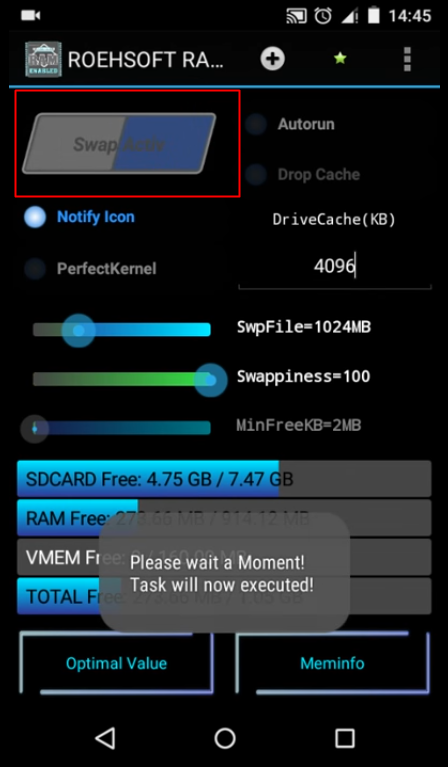
Step 5. Now simply swipe over “Swap/active” and wait for a moment until the swap is executed.

Roehsoft RAM Expander

Step 6. Now you have to select the path or partition selection for the swap. Simply, select your SD card here.

Roehsoft RAM Expander

Step 7. Now simply go back to the main page and swipe over “Swap/active” and wait until the app finishes creating the swap file.

Roehsoft RAM Expander

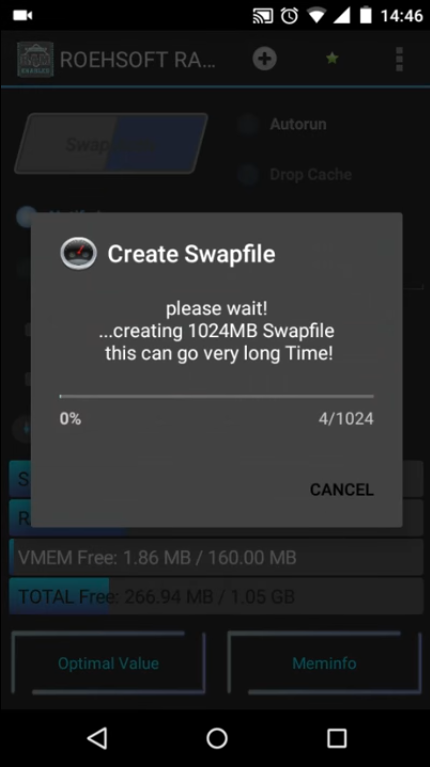
That’s it ! Now you will see your Total free RAM will increase. This is the easiest way to expand

Using RAM Manager Pro


this app  is just like roeshoft but the difference is that it can run on both none rooted device and rooted device if you have tried the above methods and did not work on your device try using this method because the above app roehsoft does not work on all devices

step 1 download ram manager pro from here and install on your android phone

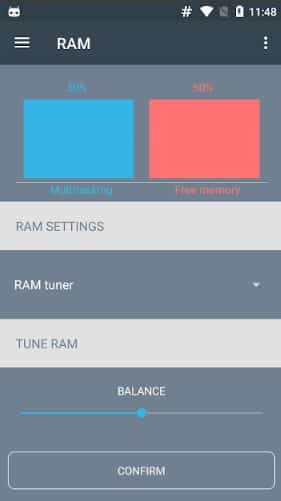
step 2 after installing you will see the main interface of the app.

Step 3 Head to the RAM settings and tap on ‘Tune RAM’ and balance it as per your wish.

Using RAM Manager Pro

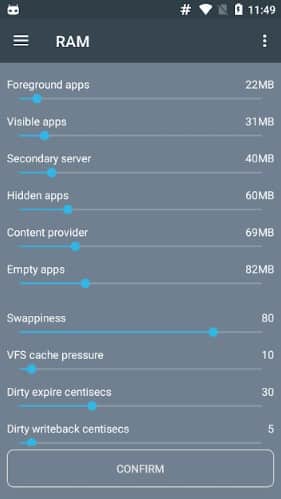
Step 4. You can set RAM usage priority for foreground apps, visible apps, secondary server, hidden apps, etc.

Using RAM Manager Pro

Step 5. If you want to Swap the SD card memory (Rooted device only) then tap on ‘Swap files’

Using RAM Manager Pro

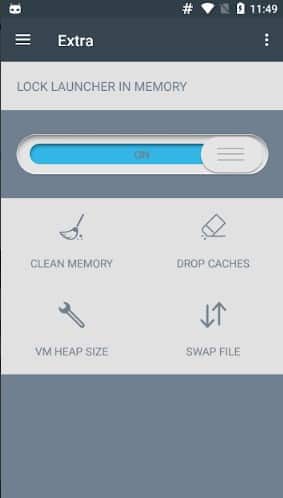
Step 6. Now you need to set the new SD card and RAM memory limit.

Using RAM Manager Pro

That’s it, you are done! This is how you can use RAM Manager Pro to increase RAM on Android. Please note that it’s an advanced app and playing with the settings might brick your Android device[damage your device],

How To Increase Ram On Android Device Using Pc

with this method you will be able to increase ram on your android phone using this pc software,to do this it will require you the following

Requirement

SD card (4 or higher SD Card)

Rooted smartphone Or Rooted Tablet (how to root android)

SD card reader

Windows PC

First of all, you need to partition your SD Card, Download Mini tool Partition from Here. Install the application on your PC and connect your SD card to your PC with Card Reader.

Step 1. Open Mini Tool Partition on your PC and when the wizards opens, click on your SD Card and select Delete option.

Partition Your SD Card for Increase Ram On Android

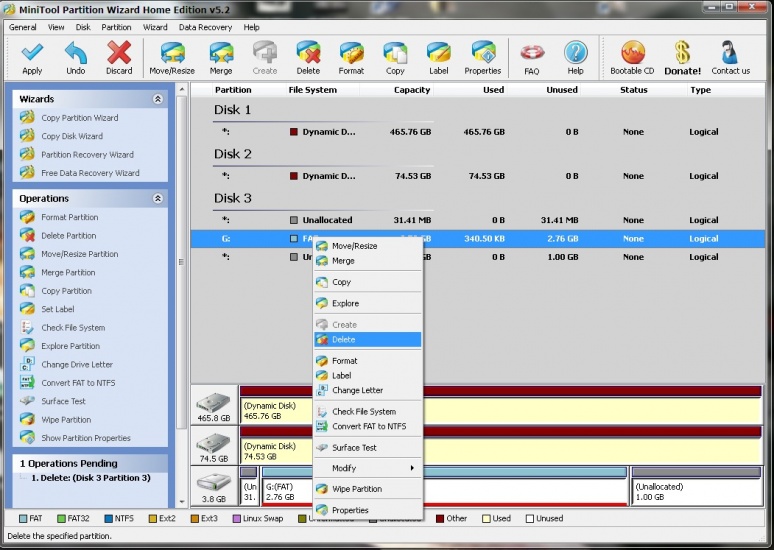
Note: This will format your SD Card completely. So, make sure to perform a complete backup of your SD card before you proceed with the next steps.

Partition Your SD Card for Increase Ram On Android

Step 2. Once the formatting is done successfully, you will have enough space on your SD Card as unallocated then just Right click on SD Card and select “make” option. A popup box will open giving you options for making partition; select the partition as primary and file system as FAT if SD Card is less than 4GB or FAT32 if your SD Card is more than 4GB.

Step 3. Leave about 512 MB or more space (your choice) for making the next partition. Then select done and do right click on unallocated space of your SD Card and again click “make” option. Select Primary partition but change the file system to Ext2, Ext3 or Ext4.

Partition Your SD Card for Increase Ram On Android

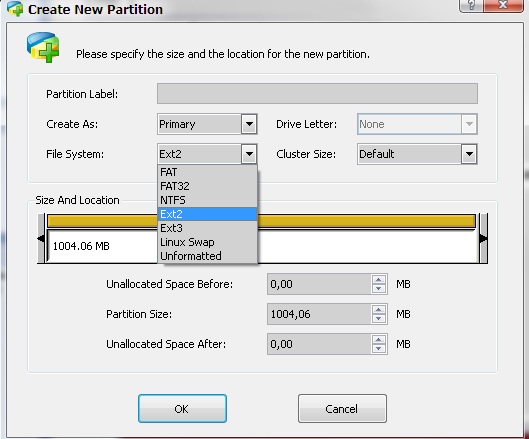
Note: (Ext2 is not compulsory as most ROMs work fine with it).

How To Recover Deleted Text Messages On Android Device

SMS is still; the most use method to communicate with friends and family members. This method has been out for an extended period of time it comes preinstalled in all mobile device, mobile Phone has made communication easier now everyone uses their phone to communicate with friend, today we are going to explain to you how to backup your SMS to your mobile Phone .this might come helpful if you or your friend or kid have by mistakenly delete your messages.to get back your message follow this bellow tricks

How To Recover Deleted Text Messages On Android Device

The method is very simple and depends on a cool recovery software that will help you to get back your deleted text messages easily. Just follow up the steps below to know how to retrieve deleted texts on Samsung, LG, or any other smartphone.

Steps To Recover Deleted Text Messages On Android

Step 1. First of all in your windows PC download and install the tool Android Data Recovery.

Recover Deleted Text Messages On Android

Step 2. Now you have to enable USB debugging in your android for that you have to go to Settings -> About Phone -> Build Number and tap on it 7-10 times. Now you will see developer option in your settings and tap on it and scroll down and enable USB Debugging.

Recover Deleted Text Messages On Android

Step 3. Now launch the tool that you installed in your PC and from there select your android version and proceed by connecting your android to your PC via USB cable. Now select the messages at the recovery section and then simply click on next.

Recover Deleted Text Messages On Android

Step 4. Now the Android Data Recovery software will ask you to Allow/Grant/ Authorize the access in order to get the privilege to scan SMS data. simply allow it.

Recover Deleted Text Messages On Android

Step 5. Now after the scan gets completed you will see all the deleted text messages from the android device, click on the items you want to restore and then click on “Recover” button.

Recover Deleted Text Messages On Android

That’s it! you are done, now the restoring process will begin and all your messages will get recover

Using Mobikin Doctor For Android.

this another method on how to backup your android sms, to use this method you will need to download this app called mobikin recover, this has android and pc version,mobikin can backup your contact and messages, the best thing with this app is that you can use it without root permission

Step 1. First of all, download and install Mobikin Doctor For Android on your computer and then plug in your phone. The software will automatically detect your connected device.

Using Mobikin Doctor For Android

Step 2. Once detected, it will display your phone data like model, system version and more. Now to recover the text messages you need to select the option ‘Messages’ and click on ‘next’

Using Mobikin Doctor For Android

Step 3. Now it will scan your deleted text messages. Wait for few minutes until it retrieves all your deleted SMS. Once done, you will see the screen like below, here you need to mark the text messages that you want to recover and then click on “Recover”

Step 4. Once recovered, it will ask you to save it directly to your PC. Simply choose or create a new folder and save it.

That’s it! you are done, this is how you can use Mobikin Doctor for Android to recover text files.

Using PhoneRescue

PhoneRescue is one of the best data recovery tools that’s available for Windows and MAC computer. The best thing about PhoneRescue is that its particularly made for Android data recovery and it does full justice to what it says. It can recover almost all file types from your Android smartphone. So, let’s check out how to use PhoneRescue to recover deleted text messages from Android.

Step 1. First of all, download & install PhoneRescue on your Windows computer from here.

Using PhoneRescue

Step 2. Now on your Android smartphone head to the Developer options and enable ‘USB Debugging’ mode. Next, connect the Android device to the computer via USB cable.

Step 3. Once done, the PhoneRescue will show you the connected device.

Using PhoneRescue

Step 4. In the next page, you will be asked to select the file type which you want to recover. There you need to select ‘Messages

Using PhoneRescue

Step 5. Now you will see all deleted messages along with the attachments. Simply select the ones that you want to recover and then click on the Recover icon for the device or computer.

That’s it, you are done! This is how you can use PhoneRescue to recover deleted text messages from Android.

How To Capture Someone’s Picture Who Tries To Unlock Your Phone

Today i will show some cool step on how to see who attempt to unlock your android device. this one of best security mode on android device which helps you know who attempts to unlock your device. this feature does not come preinstall on android device, so to get this feature you will need a third-party app to get this feature on your device, the most amazing thing with this feature is that it works on both rooted and nonrooted device, follow the below steps on how to Capture Someone’s Picture who tries to unlock your phone

Capture Someone’s Picture Who Tries To Unlock Your Phone

to do this is not a difficult thing all you need to do is to follow these below steps am going to show and everything will work perfectly for you.

Step 1. First of all, you need to download and install the app Hidden Eye.

Capture Someone’s Picture Who Tries To Unlock Your Phone

Step 2. Now open the app in your android and you will see the three checkboxes.

Capture Someone’s Picture Who Tries To Unlock Your Phone

Step 3. Now tick on the Third option there which says “Show Intruders On Unlock” and then click on ok button.

Capture Someone’s Picture Who Tries To Unlock Your Phone

Step 4. You can also check other option too according to your wish. Make sure that the app gets activated after selecting all the options.

Capture Someone’s Picture Who Tries To Unlock Your Phone

Step 5. Now, this app will work for you and when your friends try to unlock your android then this app will capture its pictures on your record. In your free time, you can check your records and can check that who tries to unlock your android in your absence.

Capture Someone’s Picture Who Tries To Unlock Your Phone

That’s it! you are done, now your android will catch your friends in your absence.

How to legally get Games for free With Full License

First of all you need to create a Twitch channel After that get 5K Followers or get free ones (You can with less followers but with 5K you´ll have a lot more games), some people are giving for free here: Free Services and Giveaways and for buy you can buy here very cheap: https://followiz.com/ Then join these sites: https://woovit.com https://www.keymailer.co/ https://www.epicgames.com/affiliate/en-US/overview You´ll need to stream or make a video of some games, more streamings more games you´ll reach (You can download a gameplay and put it like it´s a streaming, be sure to get gameplays of little streamers) You need to link your Twitch & Steam to your accounts in Keymailer & Woovit, Twitch in Epic. In Woovit you can start getting 3 games that you want, you´ll need to make a stream or upload a video of one of the 3 games for get 3 games more and this always. In Keymailer you´ll need to make a stream or upload 3 games in your channel, not matter the lenght. Then you apply to ALL the games you want! In Epic Creator when you got accepted (With 5K Subscribers and few streams are easy) you´ll receive for free some of the games released in Epic Store (You´ll receive games after got accepted, not the previous ones) If you want a game that aren´t in Woovit, Keymailer or Epic you´ll need to send an email to the developers asking for a key for stream, 90% will give you one. So with Woovit you´ll receive 3 games for each stream that you make of one of the 3 games (It can be fake stream), let´s say you make a 20 min stream, you can get 3 Games that you want available in Woovit each 20 minutes! In Keymailer it´s a bit slow, developers decide if give the game or not but there´re a lot more games. Epic Creator is automatic, when you´re accepted you´ll receive games in your account when they release in the store.

EDU MAIL NEW 2020 WORKING METHOD

  1. Go to https://www.fakeaddressgenerator.com and in the custom generate tab select Chicago Illinois and generate.
  2. Create an email address with the name you got from the generated info (Outlook, Gmail), you can also use temp mail if you want to, but sometimes they may ask to your confirm identity (your choice).
  3. Go to https://applycredit.ccc.edu/psc/ccccsprd/EMPLOYEE/SA/c/Z_SAD_OLA_MENU.Z_AD_CRED_AUTH and signup with your email address.
  4. Now choose the first option, then choose fall 2020 and Malcolm X College.
  5. In the name section just enter first and last name leave the other empty, as for the remaining info fill it as you like and use the address you got from fakeaddressgenerator.
  6. Now wait until you receive an email from Administration (usually takes 25-60 minutes)
  7. in the email you got click the password reset option and create your own password.
  8. Go to http://my.ccc.edu/ and login.
  9. Complete the remaining info, in military status choose i have no military service, and fill the other stuff randomly.
  10. For the Preferences fill it in as the following: 8,6,4 Malcolm X College and select all for day and time preferences.
  11. Done! now you can login to your Edu email from the quick access tab by clicking on Microsoft outlook.
Design a site like this with WordPress.com
Get started